8 Things to Know Before Hiking Joffre Lakes, Pemberton (2025 Guide)
Joffre Lakes is a stunning hike near Pemberton, BC that leads you up into the alpine and past 3 stunning glacier-fed lakes. Each lake connects to the same glacier and they get colder and bluer the higher you climb. A day pass is required for hiking. Backcountry camping is an option with a permit. 9.2 km round trip with a steady incline that goes up 670 m from the parking lot to campsite. No cell service and lots of mosquitoes.
This is a perfect day hike, or if you're up for it, there is camping at the highest lake. In this guide we'll go over how to do this hike as a day hike or an overnight adventure. You will be off-grid by the time you're in the parking lot so make sure you read all the tips and show up prepared!

TL;DR
Iconic half day hike to 3 pristine alpine lakes. Day pass required for hiking. Backcountry camping is an option with a permit. 9.2 km round trip with a steady incline that goes up 670 m from the parking lot to campsite. No cell service and lots of mosquitoes.
1. Key Tips For Joffre Lakes

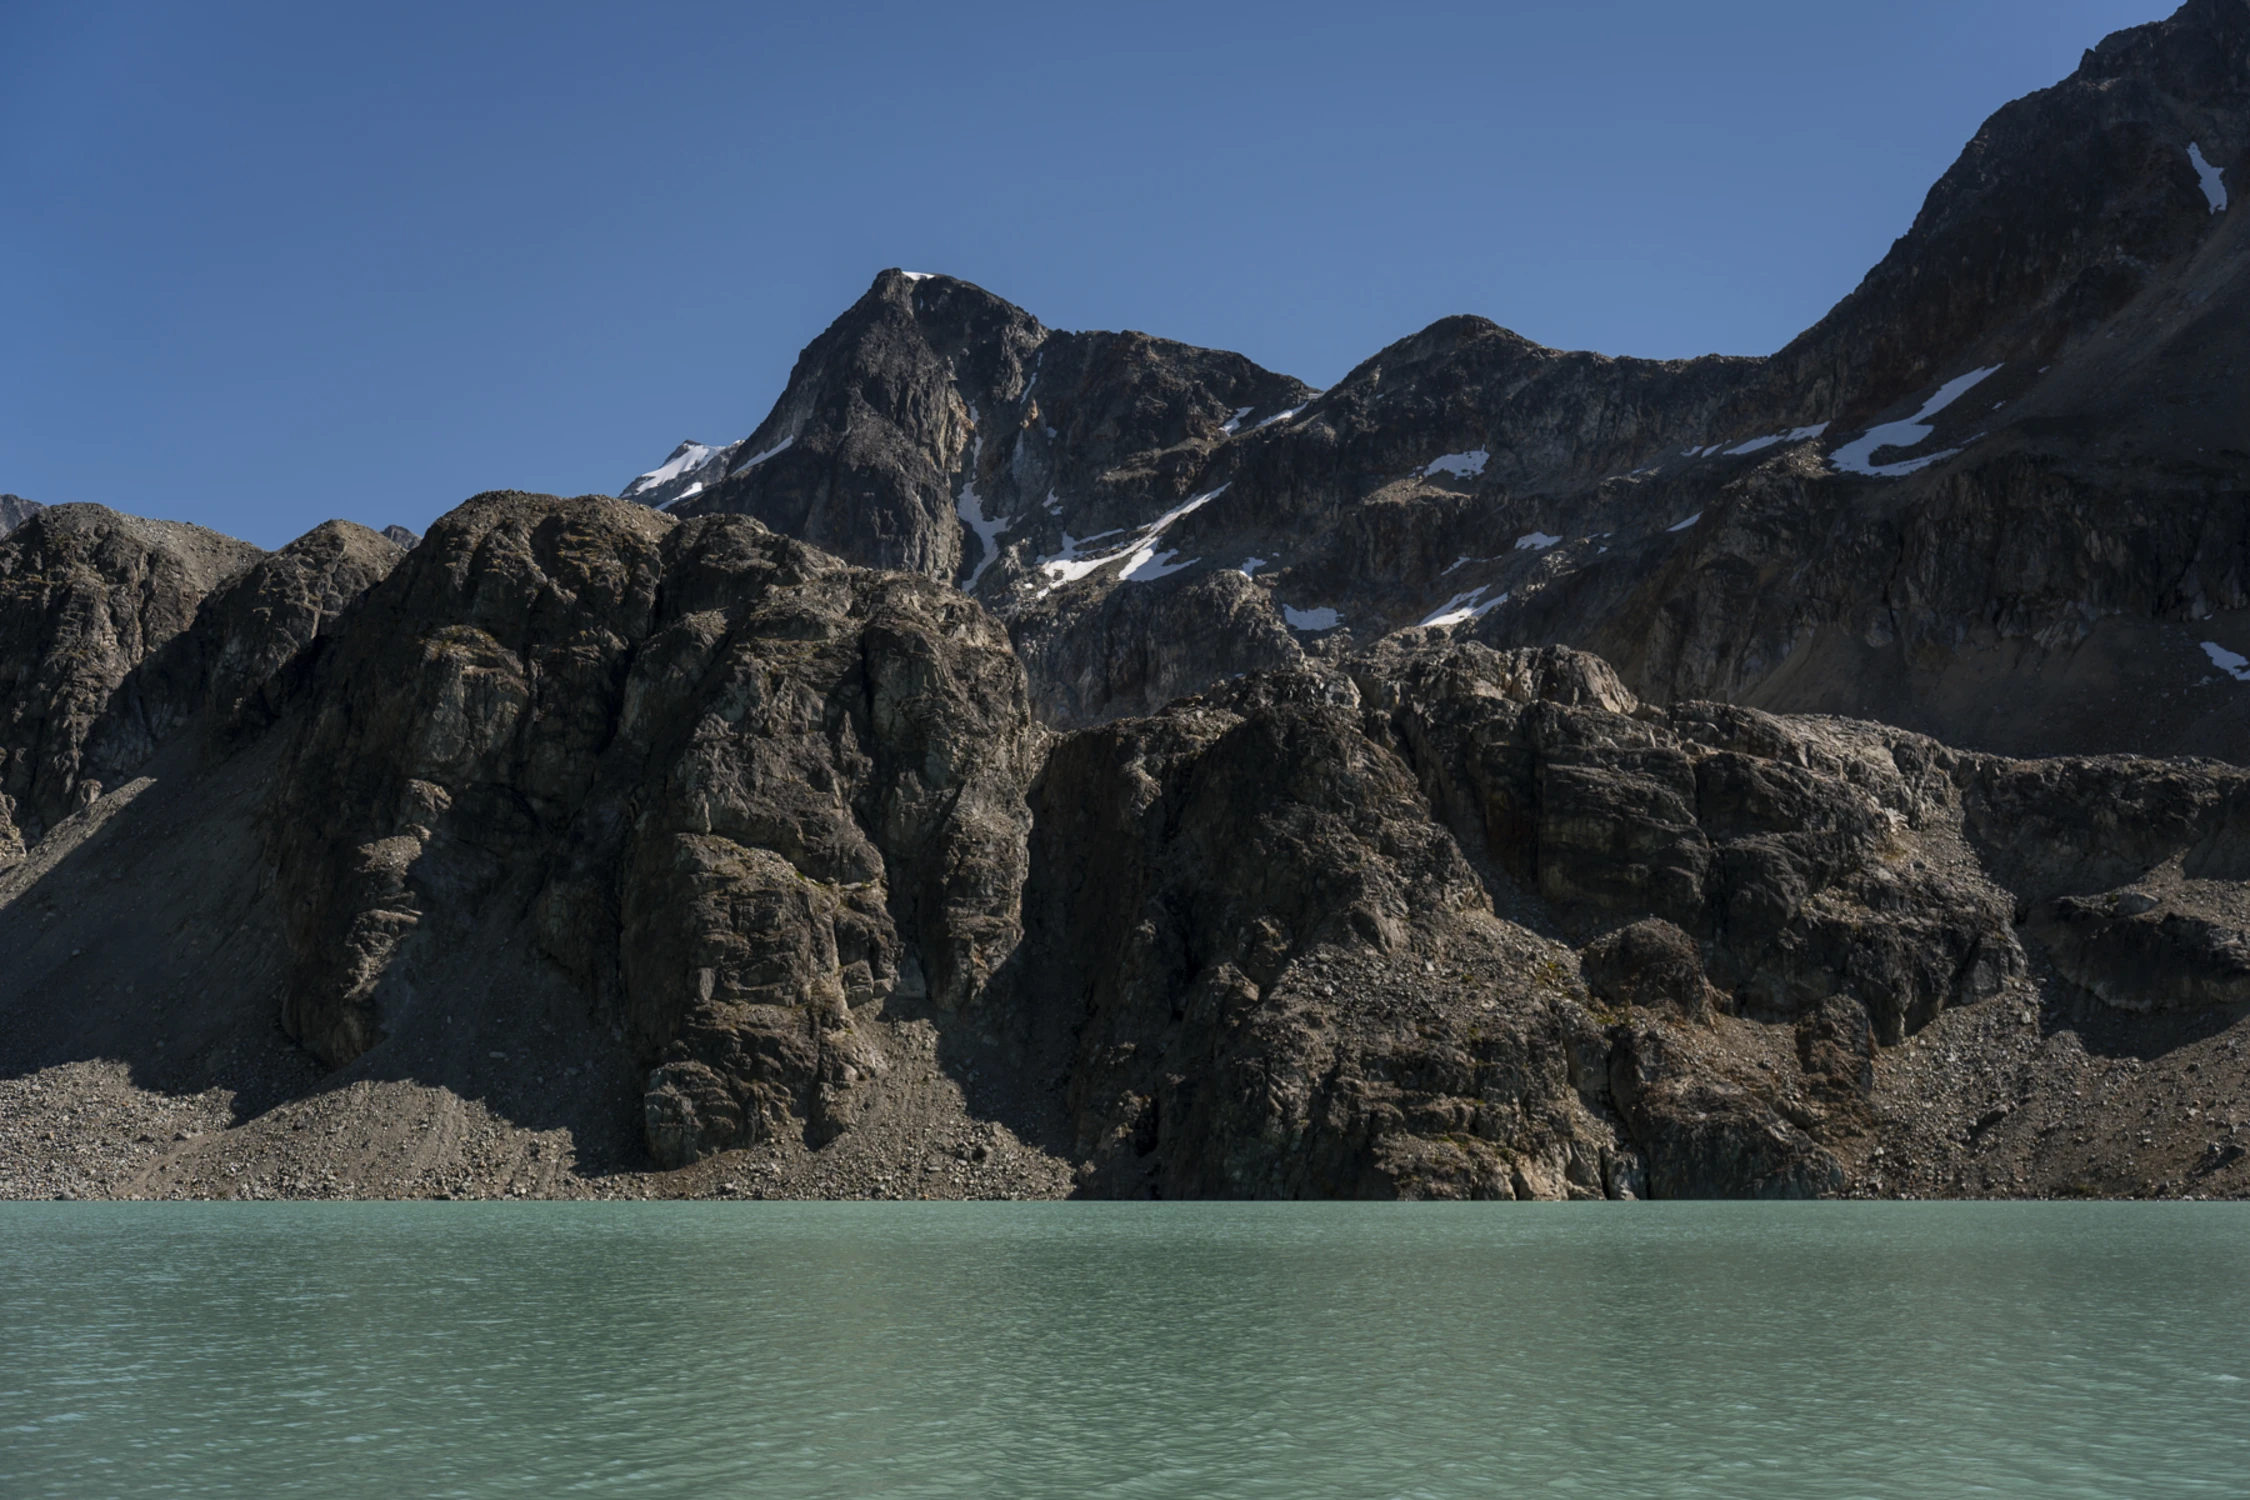
Upper Joffre Lake from above the campsite
- Mosquitoes. They are not too bad on the trail or the first 2 lakes, but at Upper Lake they can be aggressive when there is no wind. The viewpoint and the campsite are both hotspots. Bring lots of bug spray.
- Day Passes and Permits. From May to October, you’ll need a day-use pass to hike the trail. It’s free but must be reserved online through BC Parks (here) and they often sell out. Check dates and book early. They open up at 7am two days before your hike. If you are camping at the top you do NOT need a day pass, but you will need to buy a camping permit. They are $18 CAD per tent and are actually a bit easier to get than day passes, especially if you can swing it on a weekday. You can book yours here.
- Iconic Floating Log. The Instagram shot everyone comes for is at Middle Lake. This is my personal favourite spot for swimming. The log looks awesome in pictures but it's also a great diving platform. Middle lake is still a bit icy so it helps to jump right in from the log. You can lounge, swim, and snack at the rocky beach area near the log all day. If you’re wondering how to find the log, it’s just along the trail next to middle lake. It is obvious and there is always a crowd so you can’t miss it.
2. Why Hike to Joffre Lakes


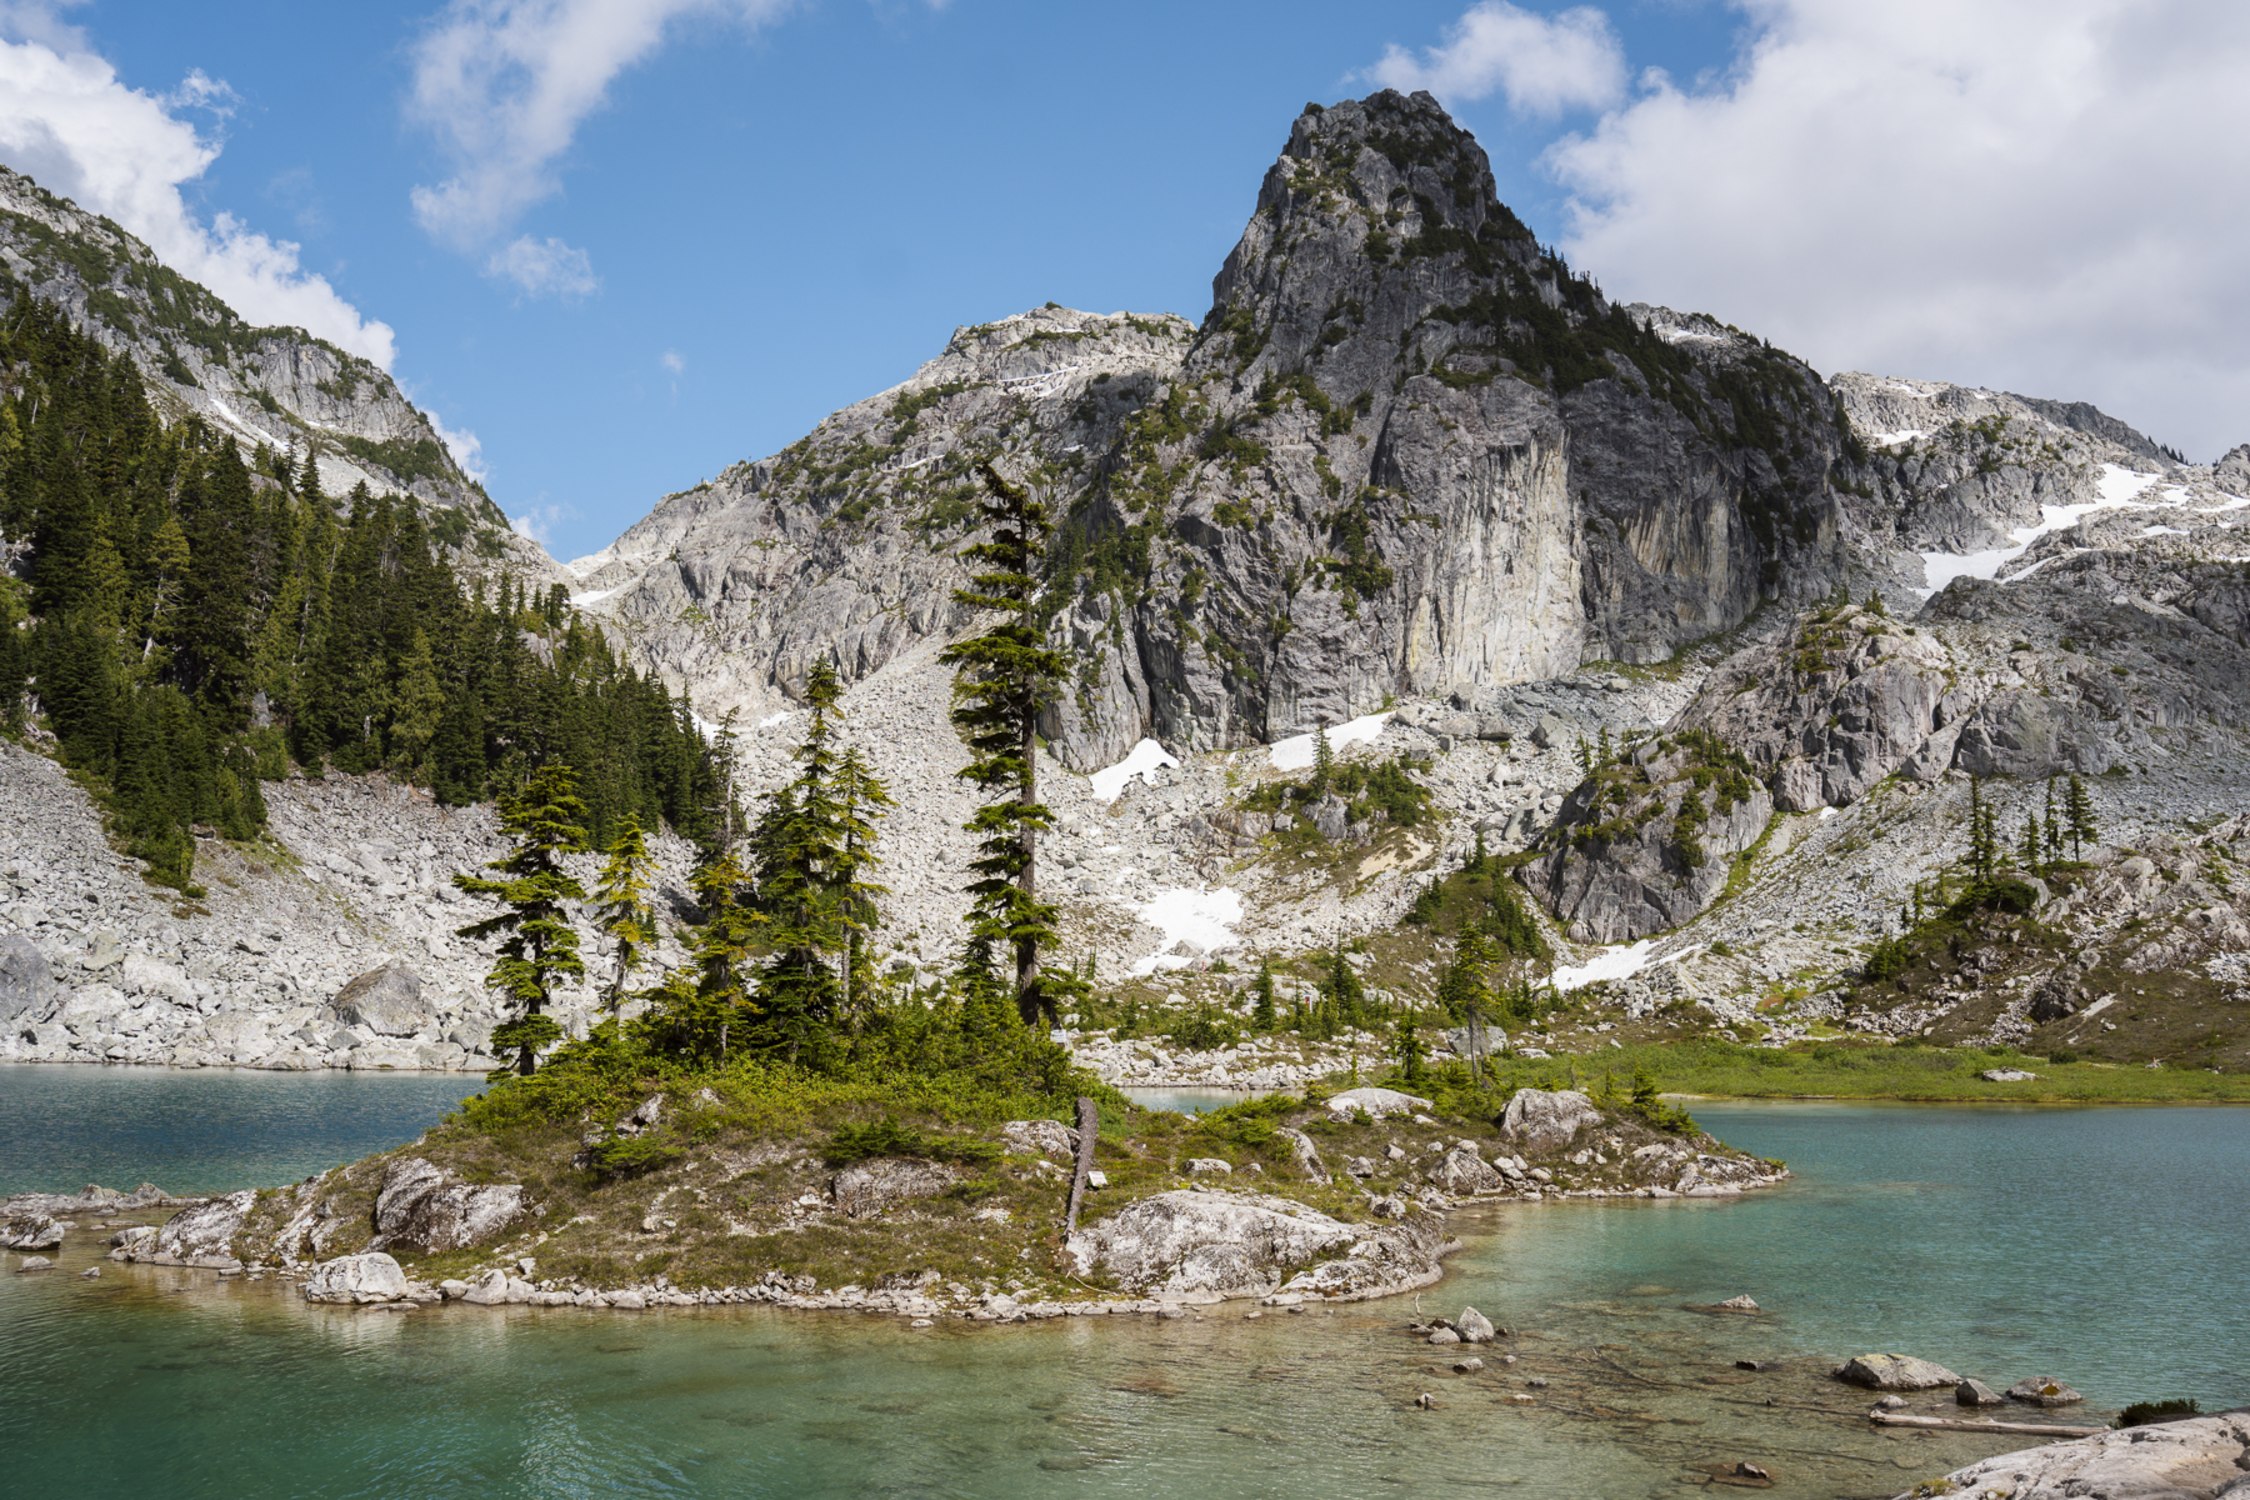
Middle Joffre Lake
Joffre Lakes is one of the most iconic hikes in British Columbia, and it lives up to the hype. It's one of those places that are famous for a good reason. Turquoise water, glacier views, and rugged peaks. With the sea of evergreen trees and blue lakes it feels like someone turned the saturation slider way up. The hike leads you past three lakes: Lower, Middle, and Upper Joffre. It's an entry level hike with hardcore backcountry pay off.
What to Expect at Each Lake
- Lower Joffre Lake: A quick 5-minute walk from the trailhead. Great teaser of that glacier blue and already epic mountain backdrops. Most people stop here for a quick photo, but don’t linger. The lakes just keep getting better.
- Middle Joffre Lake: About 2.5 km in and arguably the showstopper. The water is insanely blue (I swear we are not editing these photos to be more blue). There’s a famous log in the water where people line up for photos. It's the most touristy part of the trail but you can make it fun.
- Upper Joffre Lake: Around 3.5 km in. The final lake and across it the glacier that fuels all 3. This is where most hikers stop and eat and then turn back, so it can get a bit crowded. At the far-side of the lake there is a campsite that requires a permit.


Lower Lake (Left), Middle Lake (Centre), and Upper Lake (Right)
3. Do I Need A Permit to Hike Joffre Lakes

Upper Joffre Lake
Yes. From May to October, you’ll need a day-use pass. It’s free but must be reserved online through BC Parks (here) and they often sell out. Check dates and book early. They open up at 7am two days before your hike.
If you are camping at the top you do NOT need a day pass, but you will need to buy a camping permit. They are $18 CAD per tent and are actually a bit easier to get than day passes, especially if you can swing it on a weekday. You can book yours here.
4. How to Get to the Joffre Lakes Trailhead
The hike is in Joffre Lake Park, which is an area between North Joffre Creek and Cayoosh Pass that's managed by BC Parks. The area is called Pipi7íyekw, meaning a camping place where storage houses were, in the St̓atímcets language.
Where is the Trailhead
The trailhead is next to a big parking lot off the Duffy Lake Road 30 minutes north of Pemberton or 2.5 to 3 hours from Vancouver. It’s an easy drive and paved until you reach the parking lot.
If you don't have your own car you can compare all the major rentals companies here:
Road Conditions
In the summer months road conditions are great. It's a well maintained and paved mountain highway. Some steep parts once you’re on the duffy but wont be a concern unless you are in something very old and very heavy. Big rigs and logging trucks make it up and down all the time so it's nothing to be too concerned about.
Parking
Parking is free and the lots are big. The main lot fills most days but there is overflow parking across the highway. It adds maybe 5 minutes to your hike so it's not a big deal. This is one of the most popular hikes in BC, but BC parks limit the number of day passes they hand out each day. If you have a day pass you're still not guaranteed parking at peak hours. If you're doing this as a day hike, arrive before 7:30am if you want to park close and avoid the crowds.
5. Hiking to Joffre Lakes


Middle Lake (Left), Approaching Middle Lake (Right)
We parked in the main lot and checked in with the friendly staff at the trailhead. We told them it was our first time camping here and they explained the procedure.
- No setting up camp on the emergency Heli-Pads. Which to be fair, do look exactly like camping lots aside from the signs.
- All food needs to be in the bear safe when not being used.
- All the sites are first come first serve and checkout is at noon. So no rushing someone out of their spot.
Then we did the hike. We stopped at the middle lake for a swim and some photos and a snack and then again at the upper viewpoint and really made a day of it. We hit the trail around 9 and weren't up at camp until nearly 2. Most people will do this hike much faster (like less than 2 hours).
Time
If you’re in a hurry and you’re a strong hiker you can be up and down and back in your car on your way to lunch within 4 hours. If you’re like us and stop for a swim at each lake and take 100 photos at every view point, it could take 4 hours just to get to the campsite.


Terrain
- To Lower Lake: You can walk over to the Lower Lake, grab your pic, and turn around. Lower lake is one of the most incredible lake views I've seen (like globally) and it's only a few minutes from the parking lot. This option is perfect for anyone with limited mobility. It has that sense of a remote mountaintop lake without requiring the hike. It is still an uneven trail leading to the lake but it is mostly flat and well kept. I would advise anyone WITHOUT mobility restrictions NOT to do this option. The day-passes for this hike sell out most days all summer so we don't want to stop other people from enjoying the full experience.
- To Middle Lake: It will be about 2.5 KM and a bit over 300 M of elevation gain to the middle lake. Then it's a few minutes along the lake and you will see the beach. The terrain is pretty easy but there are some rocks and roots (so no flip flops). It gets a bit steep as you approach the lake. If you hike at all this will be a pretty easy hike for you. But if it's one of your first hikes be careful because there are loose rocks, muddy bits, and lots to look out for.
- To Upper Lake: It's about 1 KM and 100 M gain past the middle lake. This section is mostly a wide dirt path with easy terrain. Both times we passed the view point it was packed with people resting along the big boulders. It's a great place to chill out and the views are incredible. But it's not a great swim spot. There's no great place to get in and the upper lake is the coldest of the three.
- To Campsite: The campsite is just 1 KM past the upper lake viewpoint. This part of the trail is mostly flat but goes up and down a bit and the terrain is a lot harder than the rest of the hike. Most of the hike is a carefully manicured and maintained trail, but this stretch is overgrown and filled with roots and little rock scrambles. Pretty easy stuff if you hike a lot, but intimidating if you’re not used to this kind of terrain. Because of the glacier, the landscape changes each year so lots of rocks are loose so make sure you stick to the trail and take it slow if you’re not doing this kind of thing often.
Views
Each lake has its own main viewpoint, and they’re worth stopping for.
- Lower Joffre Lake greets you right off the trail with calm, mirror-like water and Mount Matier reflected in the distance. Perfect for a warm-up photo before the climb.
- Middle Joffre Lake is the crowd favourite, with a deep turquoise colour and the famous wooden log that’s perfectly placed for Instagram.
- Halloway falls: is the bonus stop between Middle and Upper Joffre Lakes. A series of powerful cascades rush right beside the trail, close enough that you’ll feel the mist on a warm day. It’s a natural break in the climb and a reminder of just how much glacial water is feeding these lakes.
- Upper Joffre Lake sits right at the base of the glacier, surrounded by rocky outcrops and waterfalls. If you’re not camping, the view from the campsite isn’t different enough from the main viewpoint to be worth the extra hike.
6. Camping at Joffre Lakes


It's bare bones camping if you're used to the more front country road-trip style campsites, but it's one of the nicest back country sites I've seen.
- There is a fast flowing stream near camp coming straight from the glacier. It's generally safe to use after boiling or treating, but make sure to check BC parks up to date recommendations before you go.
- There is a decent outhouse. It uses a well designed process that is kind of a no flush septic tank. It's not luxury but it's miles ahead of a standard outhouse. Make sure to pack your own TP though!
- The sites themselves are nice and flat but most are rocky so make sure you bring a comfy sleeping pad.
Booking a Tent Pad
You will need to buy a camping permit to spend the night. They are $18 CAD per tent and are actually a bit easier to get than day passes, especially if you can swing it on a weekday. You can book yours here.
Tent pads are first come first serve to people with a camping permit. There are several spots along the water, then a few up higher on the rocky area, then a third row even higher up on wooden platforms. Generally the lower ones have more bugs and less wind and the higher ones have more wind and less bugs. So pick your poison. Or do what we did and just take a spot in the middle.
Camping Infrastructure
- Clearly defined and first come first serve tent pads plus a few gravel spots.
- Bear-proof storage lockers.
- Outhouse close to camp.
- No fires allowed.
What to Do At The Joffre Lakes Campsite
We took a dip in the lake. Ate some snacks. Did a little explore around some of the trails that meander off into the rock slide. We made dinner at our campsite using the water from the stream and watched the alpenglow from our tent hiding from the mosquitoes.
There is a longer trail from camp that goes up closer to the edge of the glacier. There is a cool waterfall there, but we just went high enough to see a cool arial view of the lakes and then called it quits.

Upper Joffre Lake from above the campsite
Campsite Vibes
There are 3 distinct camping areas and all of the lots are pretty spread out and private. You will see lots of people out and about in camp but will have plenty of space to yourself.
During the week it is usually perfectly quiet at night if the wind isn’t too loud, but it's a popular spot for larger groups to come. So depending on who else is camping it can be one of the more raucous backcountry camping spots, especially on long weekends.
What to Pack
- Warm layers. The alpine nights get chilly even in July.
- Bug spray. Mosquitoes are around but not unbearable.
- Water filter or Tabs. There are two running streams near camp.
- Bear spray. The lake is in bear country and there is 1 local bear who frequents the campsite.
7. When to Visit Joffre Lakes

Swimming in Upper Joffre Lake
- Summer (June to Sept): Best weather and the lakes are their bluest, but busiest. We went in mid July and I slept with no sleeping bag and was able to swim in the lakes. It can be much colder in early June or past August. It also can’t get too busy because there are only so many day passes given out per day. It's a lot but it's not overwhelming.
- Fall (Oct): Fewer crowds and gorgeous golden larches, but trails can be icy and it is too cold to camp unless you have the proper gear.
- Winter: It turns into a snowshoe route. Beautiful, but advanced. No plowed parking, and avalanche risk is real. This is only for people who know what they are doing (which isn't me)
- Spring: Impractical as the snow melts.
8. Where to Stay Near Joffre Lakes
Joffre Lakes is a doable day trip from Vancouver so you can head back down to Whistler, Squamish, or all the way back to the city after the hike.
Some budget friendly options near Whistler:
- Whistler HI Hostel: This isn't in the village but it is connected by bus. Or it's a quick drive if you have your own car.
- Pangea Pod Hotel: Pod style rooms right on the village stroll.
The Pan Pacific is our favourite hotel if you want to up the budget a bit from the hostel. It has great suites and amenities like the sauna, pool, and hot tubs. But there are tons of hotels in Whistler ranging from basic budget rooms to luxury stays. You can compare all the major hotels in the area here:
If you’re looking to front country camp a bit more locally, check out Lillooet Lake. On the drive back down the duffy towards Pemberton you will pass the forest road to access all the lake front camping. There are 4 paid sites on the lake:
Final Thoughts
- Leave no trace: Like every hike make sure you leave everything just as it was and pack out what you pack in.
- Drones are banned. The signage is clear, the fines are real, and the local sentiment towards drones is negative. You could get some sick shots for sure, but will piss everyone off and get slapped with a massive fine.
- Don’t swim in the lakes unless you’re okay being extremely cold. We swam in July because the water was around 10 degrees. It is glacier-fed water so it was in recent history actual ice. The water is colder other times of year and if you don't have the sun or you get a cold wind you could be putting yourself in danger. If you don't normally like cold dips, this is not the spot to try it out.